1- Gather your materials.
To make a lemon battery you will need a piece of copper (A clean copper coin will work.), a piece of zinc (A galvanized nail will work.) a good-sized fresh lemon (Preferably one with a thin rind.), some copper wire, a knife, and a voltmeter or electric device (Something that requires a low voltage power supply such as a digital watch or LED bulb).
2- Squeeze the lemon without breaking its skin.
The best way to do this is to roll the lemon on a table and apply downward pressure. The idea is to release the juices inside the lemon but keep them inside the lemon.
3- Cut a small slit through the rind in the middle of the lemon.
This slit is to hold your copper or clean copper coin. Make sure it’s not too big. You want your copper or copper coin to sit snuggly about half in and half out.
4- Insert the copper and the zinc into the lemon.
The copper or copper coin should fit snuggly into the slit you’ve already made. The zinc or galvanised nail should be pushed into the lemon about 2 cm away from the copper or copper coin. The copper and zinc (Or copper coin and galvanised nail.) will act as the positive and negative terminals of your lemon battery. They need to be this close to each other to work well but must not touch each other outside or inside the lemon or the short circuit will cause the battery not to work. They also need to be deep enough into the lemon to be in contact with the lemon juice.
5- Attach the device to the lemon battery.
If you’re using a voltmeter, attach one clip to the zinc (Or galvanised nail.) and the other clip to the copper (Or copper coin). You should see a small increase in voltage on the voltmeter. If the voltmeter is reading a negative value, simply switch the clips on the nail and penny and it should change to a positive voltage.
If using a low-voltage device, use some copper wire to attach the zinc (Or galvanised nail.) to one terminal of the device and some more to attach the copper (Or copper coin) to the other terminal of the device. If the device won’t work you perhaps need to use the opposite terminals or increase the power of your battery. (See below)
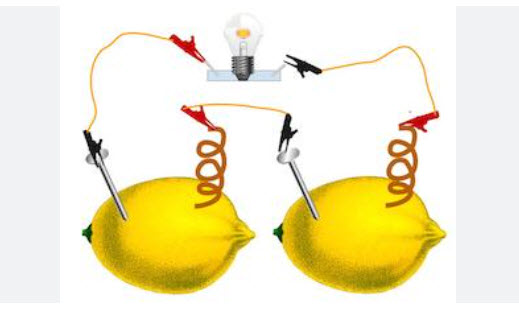
Multi-Cell Lemon Batteries to increase power output.
1- Gather your tools.
A multi-cell battery is when you connect multiple batteries together. In this case, lemon batteries are connected in series. To make a multi-cell lemon battery you will need four pieces of copper (Four clean copper coins will work.), four pieces of zinc (Four galvanized nails will work.) four good-sized fresh lemons (Preferably with thin rinds.), some copper wire, a pair of wire cutters, a knife, and a voltmeter or electric device (Something that requires a low voltage power supply such as a digital watch or LED bulb).
2- Squeeze the lemons without breaking their skin.
The best way to do this is to roll the lemon on a table and apply downward pressure. The idea is to release the juices inside the lemon but keep them inside the lemon.
3- Cut the copper wire.
Use the wire cutters to cut five pieces of copper wire approximately 7cm long each.
4- Connect copper and zinc with pieces of wire.
Make three pairs of copper (Or clean copper coins.) connected to Zinc (Or galvanised nails.) with copper wire. Make sure the wire is tightly attached to each end to make good connections.
5- Wrap a piece of wire around the remaining copper and zinc
You should have one piece of copper (Or clean copper coin.) and one piece of zinc (Or galvanised nail.) remaining along with two pieces of copper wire. Tightly tie one piece of wire around the copper (Or clean copper coin.) and the other around the piece of zinc (Or galvanised nail.). The multi-cell battery will begin with a single copper wire-wrapped piece of copper (Or clean copper coin.) and end with a single copper wire-wrapped piece of zinc (Or galvanised nail.).
6- Cut a small slit through the rind in the middle of the lemons.
This slit is to hold your copper or clean copper coin. Make sure it’s not too big. You want your copper or copper coin to sit snuggly about half in and half out so that it sits in the lemon juice.
7- Order the lemons.
Line up all four of your lemons. Place the copper wire-wrapped piece of copper (Or clean copper coin.) into the slit you cut into the top of the first lemon. Insert the copper wire-wrapped piece of zinc (Or galvanised nail.) into the last lemon.
8- Insert the pairs of copper and zinc joined by copper wire.
You’re aiming for each lemon to end up with a piece of copper (Or clean copper coin.) connected to a piece of Zinc (Or galvanised nail.) Use one of the copper wire-wrapped pairs of copper (Or clean copper coin.) connected to a piece of Zinc (Or galvanised nail.) Put the Zinc (Or galvanised nail.) into the first lemon and the copper (Or clean copper coin.) into the second lemon. Do likewise to link the second lemon to the third lemon and the third lemon to the fourth lemon which already has the copper wire-wrapped piece of zinc (Or galvanised nail.) in it. Remember to ensure each piece of copper (Or clean copper coin.) and each piece of Zinc (Or galvanised nail.) are not touching inside the lemon but are in contact with the lemon juice.
9- Attach the device to the lemon battery.
If you’re using a voltmeter, attach one clip to the free end of the copper wire wrapped around the zinc (Or galvanised nail.) in the fourth lemon and the other clip to the free end of the copper wire wrapped around the copper (Or copper coin.) in the first lemon. You should see an increase in voltage on the voltmeter compared to the single lemon battery. If the voltmeter is reading a negative value, simply switch the clips on the nail and penny and it should change to a positive voltage.
If using a low-voltage device, use the free copper wire attached to the zinc (Or galvanised nail.) in the fourth lemon to one terminal of the device and the free copper wire attached to the copper (Or copper coin) to the other terminal of the device.
Of course, you could alternatively save yourself a lot of trouble and a lot of lemons by purchasing replacement batteries for all your devices from UK Battery.
Leave a Reply